
Over the past few years, home gyms have shifted from a luxury to a daily necessity. Millions of people now rely on their personal equipment to stay active, making a broken machine more than just a minor inconvenience—it disrupts your entire fitness routine. As smart home gyms and advanced running machines dominate 2026, keeping your equipment in peak condition is more critical than ever.
Navigating common treadmill problems does not have to be frustrating. Whether you are dealing with a slipping belt, an unresponsive console, or a motor that overheats, understanding the root cause is the first step to a reliable solution. We have spent years diagnosing, servicing, and fixing complex fitness machinery. Through our hands-on experience, we know exactly what keeps a machine running smoothly and how proper care prevents serious mechanical failures.
Investing time in a regular treadmill maintenance service extends the lifespan of your machine, saving you from expensive replacements and dangerous electrical hazards. In this guide, we outline the absolute essentials of treadmill repair, walking you through proper diagnosis and the exact steps needed to get your machine—and your workout—back on track.
Section 2: Treadmill Belt Repair Guide
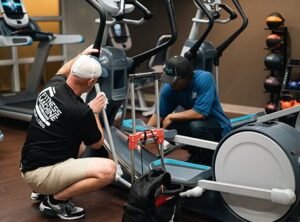
The walking belt is the most actively used component of your fitness machine. Because it takes the brunt of your foot strikes, it is also the source of many common treadmill problems. Learning how to manage treadmill belt repair safely will keep your machine running smoothly and protect the expensive drive motor from burning out.
How Treadmill Belt Damage Happens
Treadmill belts do not last forever. Even with top-tier equipment, everyday friction slowly degrades the material. The most common cause of premature belt failure is a lack of lubrication. When the deck runs dry, the belt drags heavily across the surface. This creates intense heat that breaks down the fabric backing.
Over-tightening is another frequent culprit. When you tighten the belt too much to fix a minor slip, you put massive stress on the seams and the roller bearings. Finally, dirt and pet hair easily accumulate underneath the belt. This debris acts like sandpaper, grinding away the belt’s protective layers during every workout.
Signs of a Worn or Loose Belt
Catching belt degradation early makes your regular treadmill maintenance service much easier. Pay attention to how the machine feels and sounds while you walk. A loose belt usually reveals itself through hesitation. When you plant your foot, the belt stops for a split second while the motor keeps turning.
A physically worn belt shows obvious visual cues. Look for frayed edges, curling along the sides, or a shiny, glazed appearance down the middle of the track. You might also experience frequent static shocks when touching the console. This happens because the anti-static fibers woven into the belt have worn completely away.
Step-by-Step Troubleshooting
Before you order parts or call a technician, you can perform a basic treadmill belt repair and tension adjustment at home. Follow these steps to restore proper function:
- Disconnect the Power: Always unplug your machine from the wall before touching any moving parts.
- Check the Tension: Lift the belt at the center of the deck. You should be able to lift it about two to three inches off the board. If it lifts higher, it is too loose. If it barely moves, it is too tight.
- Adjust the Roller Bolts: Locate the two adjustment bolts at the rear base of the treadmill. Use an Allen wrench to turn both bolts clockwise by one-quarter turn to tighten a loose belt.
- Align the Track: If the belt drifts to the left, turn the left bolt clockwise a quarter turn. If it drifts right, turn the right bolt clockwise.
- Test the Movement: Plug the machine back in and run it at 2 mph. Watch the belt to ensure it tracks straight down the center. Step on the machine to confirm the hesitation is gone.
When to Repair vs. Replace
Deciding between a quick fix and a total replacement depends on the physical condition of the material. You can usually repair slipping, drifting, and squeaking issues with proper tensioning and a fresh application of 100% silicone lubricant. These are routine maintenance tasks that do not require new parts.
However, you must replace the belt entirely if you spot structural damage. Torn seams, exposed deck fabric, deep grooves, or severe edge curling mean the belt has reached the end of its life. Continuing to use a structurally compromised belt forces the motor to overwork, which can quickly lead to complete electrical failure.
Section 1: Most Common Treadmill Problems
Even the most advanced fitness equipment faces wear and tear over time. Recognizing the early warning signs of common treadmill problems can save you from costly replacements. As part of a thorough treadmill maintenance service routine, learning to identify these issues ensures your machine stays safe and fully functional. Here is a breakdown of the most frequent malfunctions and how to diagnose them.
Treadmill Not Turning On
A completely unresponsive machine is one of the most stressful treadmill problems you can encounter. Fortunately, the fix is often simple.
- Causes: Power surges, a tripped circuit breaker, a faulty power cord, or a dislodged safety key.
- Symptoms: The display console remains totally dark, and the motor will not engage when you press start.
- Quick Diagnosis Tips: First, verify that the outlet works by plugging in a lamp. Next, inspect the treadmill’s power cord for visible damage. Finally, check the reset switch or breaker located near the power cord base and ensure the safety key sits firmly in place.
Belt Slipping or Misalignment
Your walking belt takes the most impact during a workout. When it stops functioning correctly, it can create a serious safety hazard.
- Causes: Improper belt tension, uneven flooring, or a worn-out belt that lacks proper lubrication.
- Symptoms: You experience a jerky, hesitating motion with each step, or you notice the belt rubbing against the side rails.
- Quick Diagnosis Tips: Turn the machine on at a slow walking speed (around 1-2 mph) without stepping on it. Watch the belt carefully. If it drifts left or right, you need to adjust the rear roller bolts. If it hesitates when you step on it, the belt lacks proper tension.
Motor Overheating
A treadmill motor works hard to keep you moving. When it overworks, it can fail completely, requiring an expensive treadmill repair.
- Causes: High friction from a dry walking belt, blocked ventilation, or a failing motor drive belt.
- Symptoms: You smell a faint burning plastic or rubber scent, or the machine shuts down abruptly mid-workout.
- Quick Diagnosis Tips: After unplugging the machine, carefully feel the motor hood. If it feels excessively hot, you likely have a friction issue. Lift the walking belt slightly; if it feels bone dry underneath, you must lubricate it immediately.
Speed Inconsistency
An erratic walking pace disrupts your rhythm and can cause you to lose your balance.
- Causes: A dirty or misaligned speed sensor, a failing motor control board, or heavy wear on the drive belt.
- Symptoms: The machine suddenly speeds up, slows down, or stutters without you touching the controls.
- Quick Diagnosis Tips: Unplug the machine and remove the motor hood. Locate the speed sensor near the front roller pulley. Gently wipe away any dust and ensure the small magnet on the pulley aligns closely with the sensor as it spins.
Noise Issues
A quiet hum is normal, but loud, disruptive sounds indicate mechanical friction or loose components.
- Causes: Loose hardware, worn-out roller bearings, or motor brush wear.
- Symptoms: You hear loud squeaking, grinding, scraping, or rattling noises during operation.
- Quick Diagnosis Tips: Run the treadmill while standing next to it. If the noise happens without a user on the belt, the issue likely stems from the front or rear rollers. A squeak often points to a dry belt, while a grinding sound usually means bad roller bearings.
Display Console Errors
Modern treadmills rely heavily on internal computers. When the brain of the machine glitches, your workout stops.
- Causes: Loose wiring harnesses, software glitches, or static electricity buildup.
- Symptoms: The screen flashes, freezes, goes entirely blank, or displays specific error codes (like E1 or E2).
- Quick Diagnosis Tips: The simplest fix is a hard reset. Unplug the machine for 60 seconds to clear the system cache. If the screen remains blank but the machine beeps, check the main wire harness connecting the console to the motor control board to ensure it remains securely plugged in.
Section 2: Treadmill Belt Repair Guide
The walking belt is the most actively used component of your fitness machine. Because it takes the brunt of your foot strikes, it is also the source of many common treadmill problems. Learning how to manage treadmill belt repair safely will keep your machine running smoothly and protect the expensive drive motor from burning out.
How Treadmill Belt Damage Happens
Treadmill belts do not last forever. Even with top-tier equipment, everyday friction slowly degrades the material. The most common cause of premature belt failure is a lack of lubrication. When the deck runs dry, the belt drags heavily across the surface. This creates intense heat that breaks down the fabric backing.
Over-tightening is another frequent culprit. When you tighten the belt too much to fix a minor slip, you put massive stress on the seams and the roller bearings. Finally, dirt and pet hair easily accumulate underneath the belt. This debris acts like sandpaper, grinding away the belt’s protective layers during every workout.
Signs of a Worn or Loose Belt
Catching belt degradation early makes your regular treadmill maintenance service much easier. Pay attention to how the machine feels and sounds while you walk. A loose belt usually reveals itself through hesitation. When you plant your foot, the belt stops for a split second while the motor keeps turning.
A physically worn belt shows obvious visual cues. Look for frayed edges, curling along the sides, or a shiny, glazed appearance down the middle of the track. You might also experience frequent static shocks when touching the console. This happens because the anti-static fibers woven into the belt have worn completely away.
Step-by-Step Troubleshooting
Before you order parts or call a technician, you can perform a basic treadmill belt repair and tension adjustment at home. Follow these steps to restore proper function:
- Disconnect the Power: Always unplug your machine from the wall before touching any moving parts.
- Check the Tension: Lift the belt at the center of the deck. You should be able to lift it about two to three inches off the board. If it lifts higher, it is too loose. If it barely moves, it is too tight.
- Adjust the Roller Bolts: Locate the two adjustment bolts at the rear base of the treadmill. Use an Allen wrench to turn both bolts clockwise by one-quarter turn to tighten a loose belt.
- Align the Track: If the belt drifts to the left, turn the left bolt clockwise a quarter turn. If it drifts right, turn the right bolt clockwise.
- Test the Movement: Plug the machine back in and run it at 2 mph. Watch the belt to ensure it tracks straight down the center. Step on the machine to confirm the hesitation is gone.
When to Repair vs. Replace
Deciding between a quick fix and a total replacement depends on the physical condition of the material. You can usually repair slipping, drifting, and squeaking issues with proper tensioning and a fresh application of 100% silicone lubricant. These are routine maintenance tasks that do not require new parts.
However, you must replace the belt entirely if you spot structural damage. Torn seams, exposed deck fabric, deep grooves, or severe edge curling mean the belt has reached the end of its life. Continuing to use a structurally compromised belt forces the motor to overwork, which can quickly lead to complete electrical failure.
Section 3: Treadmill Maintenance Service Checklist
Preventing serious treadmill problems requires consistent upkeep. You do not need to be a mechanical engineer to keep your equipment running beautifully. Following a structured treadmill maintenance service checklist extends the life of your machine and saves you from costly treadmill repair bills down the line. Keep this guide handy to ensure you never miss a critical maintenance step.
Cleaning and Dust Removal
Dust is the silent killer of fitness equipment. When dirt and debris build up, they clog the motor ventilation and increase friction under the walking belt. Wipe down the entire machine with a damp cloth after every workout to remove sweat, which can corrode metal parts quickly. Never spray cleaning solutions directly onto the display console, as liquid can seep into the sensitive internal electronics.
Weekly Maintenance Tasks
Your weekly routine focuses on visual inspections and basic sanitation. First, vacuum the floor around and underneath the machine to capture loose pet hair and dust. Next, inspect the walking belt for proper alignment. Run the machine at a slow speed without standing on it. Watch the belt carefully to ensure it tracks straight down the center of the deck without rubbing the edges.
Monthly Maintenance Tasks
Once a month, you need to perform a deeper mechanical check. Unplug the machine and inspect the power cord for any crimps, heavy wear, or exposed wires. Grab an Allen wrench and check all visible hardware, tightening any loose bolts on the handrails and console mast. Finally, remove the motor cover and carefully vacuum away any dust resting near the motor control board, taking care not to bump any loose wires.
Treadmill Lubrication Guide
A dry walking deck forces the drive motor to work twice as hard, leading to premature failure. You must lubricate the deck every three to six months, depending on your usage volume. Always use a 100% silicone treadmill lubricant, as petroleum-based products will quickly destroy the belt fabric.
To apply the lubricant, unplug the machine and loosen the rear roller bolts slightly. Lift the side of the belt and apply the silicone in a zigzag pattern across the direct center of the deck where your feet land. Tighten the belt back to its original tension. Finally, plug the machine in and walk on it at a very slow pace for five minutes to spread the liquid evenly.
Professional Servicing Schedule
While DIY maintenance handles the daily and weekly basics, you should still schedule a professional treadmill maintenance service annually. An expert technician possesses the diagnostic tools to test motor voltage, recalibrate the speed sensors, and check the structural integrity of the internal drive belt. If you run heavily on your machine or share it with multiple household members, consider bringing in a professional every six months to keep your investment perfectly tuned.
Section 4: DIY Fixes vs. Professional Repair
When you encounter treadmill problems, your first instinct might be to grab a toolbox and fix the issue yourself. While handling basic upkeep saves time and money, digging too deep into complex machinery can lead to bigger headaches. Understanding the boundary between a simple DIY adjustment and a job for an expert ensures your machine stays safe to use.
Here is a clear breakdown of what you can tackle at home and when you need to schedule a professional treadmill repair.
What Users Can Safely Fix at Home
You do not need an engineering degree to perform a standard treadmill maintenance service. Manufacturers design modern fitness equipment with user-friendly adjustments in mind. If you follow the user manual closely, you can safely perform several routine tasks.
You can easily manage walking belt adjustments. If your belt slips or drifts, tightening the rear roller bolts with an Allen wrench is a safe, simple fix. Applying 100% silicone lubricant to a dry deck is another routine task that requires no special skills. You can also replace basic external parts, such as a lost safety key, a cracked cup holder, or a frayed power cord. As long as you unplug the machine first, tightening loose handrail bolts and vacuuming dust away from the motor cover fall firmly into the DIY category.
The Risks of DIY Repair
While basic maintenance is safe, attempting a deep mechanical treadmill repair carries significant risks. The most immediate danger involves high-voltage electricity. Treadmills store electrical current in their capacitors even after you unplug them. Touching the wrong component on the motor control board can result in a severe electric shock.
Beyond physical safety, you risk voiding your manufacturer’s warranty. Most brands state that unauthorized repairs on internal components immediately cancel your coverage. Furthermore, diagnosing treadmill problems incorrectly often leads to wasted money. For example, a user might buy and install a costly new console, only to discover a cheap, faulty wire harness actually caused the blank screen.
When to Call a Treadmill Repair Technician
Some situations demand professional expertise. If you notice a burning smell coming from the motor hood, unplug the machine immediately and call a technician. This symptom indicates a melting drive belt or a failing motor, both of which require specialized diagnostic tools to evaluate.
You should also hire a professional if your treadmill abruptly stops at high speeds, trips your home’s circuit breaker repeatedly, or displays complex computer error codes that a hard reset cannot fix. Replacing main drive motors, installing new motor control boards, or swapping out damaged front rollers are complex tasks. A trained technician knows how to calibrate these new parts properly so they communicate correctly with the console.
Cost Comparison: DIY vs. Professional (2026 Estimates)
Budget often drives the decision between fixing it yourself and calling a pro. While prices vary based on your location and the brand of your machine, here is a basic cost estimate range to help you plan.
DIY Repair Costs:
- Routine Lubrication: $15 to $25 (cost of silicone lubricant).
- Walking Belt Replacement: $60 to $150 (cost of the belt only).
- Basic Hardware/Safety Keys: $10 to $30.
Professional Treadmill Repair Costs:
- Diagnostic Service Call: $100 to $175 (covers the technician’s travel and troubleshooting time).
- Standard Labor Rate: $100 to $150 per hour.
- Annual Maintenance Service: $125 to $200 (includes deep cleaning, calibration, and lubrication).
- Major Repairs (Motor or Board Replacement): $300 to $600+ (includes both parts and labor).
Investing in an annual professional tune-up often prevents those expensive major repairs. By knowing your limits and recognizing when to call for backup, you protect both your wallet and your workout routine.
Section 5: Expert Tips for Extending Treadmill Life
A high-quality running machine represents a major financial investment. If you treat your equipment well, it can easily last for a decade or more. Preventing common treadmill problems requires a proactive approach to daily care. By building a few simple habits, you can protect your machine from early wear and tear.
Preventive Maintenance Habits
Consistency is the secret to mechanical longevity. Wiping down your machine after every run stops corrosive sweat from eating away at the metal frame. You must also check the walking belt tension regularly to ensure it tracks straight down the center.
Scheduling an annual professional treadmill maintenance service is equally vital. A trained technician will catch hidden wear inside the motor compartment before it causes a breakdown. Finding these minor faults early keeps you from paying for a major treadmill repair later.
Proper Usage Guidelines
How you start your workout heavily impacts the internal drive motor. You should never stand directly on the walking belt when you turn the machine on. The motor has to work incredibly hard to move your full body weight from a complete stop.
Instead, straddle the belt and stand firmly on the plastic side rails. Press the start button and let the belt reach a slow walking speed. Once the belt moves steadily, step onto the track and gradually increase your pace. This simple habit drastically reduces motor strain.
Voltage Protection Advice
Modern treadmills rely on highly sensitive computer boards to manage speed and incline. Power spikes can fry these complex electronics instantly. You must plug your machine into a dedicated electrical circuit to prevent overloading your home wiring.
Never plug your treadmill directly into a standard wall outlet. You need a dedicated, heavy-duty surge protector designed specifically for large appliances. A basic power strip will not stop a major electrical surge, which can lead to a completely ruined motor control board.
Environment Setup Tips
Where you place your machine matters just as much as how you use it. You must keep your equipment in a dry, climate-controlled room. Cold garages and damp unfinished basements expose the electronics to severe moisture, leading to rapid rust and short circuits.
If you set up your home gym on a carpeted floor, buy a thick rubber equipment mat. The mat prevents the cooling fans from pulling loose carpet fibers directly into the motor housing. Keeping dust and debris away from the moving parts ensures a smooth, quiet ride for years to come.
Section 6: When You Need Emergency Repair Services
Even with a flawless treadmill maintenance service routine, heavy usage and time can push a machine past its limits. Some treadmill problems require more than a simple belt adjustment or a fresh coat of silicone lubricant. When critical components fail, pushing through a workout can turn a minor mechanical issue into a complete system breakdown or a severe physical hazard.
Knowing when to step off the belt and call an expert protects both your physical safety and your financial investment. Here are the critical indicators that your machine requires an emergency treadmill repair.
Warning Signs of Serious Damage
Visual and auditory cues often alert you to severe structural or mechanical failure before the machine stops working entirely. If you hear a loud, metal-on-metal grinding sound, your roller bearings have likely collapsed. Continuing to run on seized rollers will quickly shred the walking belt and overheat the drive motor.
Deep cracks in the running deck also demand immediate attention. The deck supports your entire body weight during high-impact strikes. If the wood or synthetic material splinters, your foot could break right through the board during a sprint. Never attempt to patch or tape a cracked deck; you must replace it completely before using the machine again.
Motor Failure Indicators
The drive motor acts as the beating heart of your fitness equipment. When it begins to fail, the symptoms are usually sudden and unmistakable. The most common red flag is a distinct burning smell—often resembling melting plastic or scorched rubber—wafting from the front hood. This odor means the motor is actively burning itself out due to severe friction or an internal electrical short.
Another clear indicator of motor failure is a sudden, extreme loss of power. If the machine abruptly stops dead while you are running at full speed, do not try to restart it. Forcing a failing motor to run can permanently destroy the expensive motor control board, effectively doubling your treadmill repair costs.
Electrical Hazards
Fitness equipment draws a massive amount of electricity. When wiring degrades, the machine becomes a serious fire and shock hazard. If your treadmill repeatedly trips your home’s circuit breaker the moment you press the start button, you have a major electrical short. Do not keep flipping the breaker back on; leave the machine unplugged and call a technician immediately.
Frequent static shocks also signal a dangerous electrical breakdown. While a mild static pop can happen in dry winter months, continuous, painful shocks mean the machine is no longer grounding electricity properly. This often points to severed internal ground wires or a completely degraded anti-static walking belt.
Safety Concerns
Your physical well-being always takes priority over a workout. If the console buttons stop responding while the belt is moving, you lose the ability to control your speed or stop the machine safely. This defect traps you on a moving belt, posing a massive fall risk.
Similarly, if the emergency safety key mechanism fails to stop the belt when pulled, the machine is fundamentally unsafe to operate. The safety key is your ultimate failsafe. If you experience these critical control failures, unplug the machine from the wall right away. Only a certified professional should diagnose and fix these severe treadmill problems.
Frequently Asked Questions
Understanding how to care for your fitness equipment helps you avoid costly downtime. Here are the answers to the most common questions we receive about treadmill repair and upkeep.
How often should a treadmill be serviced?
You should schedule a professional treadmill maintenance service at least once a year. If you use the machine daily or share it with multiple heavy runners, increase this to every six months. Regular servicing keeps the internal components clean and ensures the motor runs at optimal efficiency. Between professional visits, you must vacuum around the machine and lubricate the deck every few months.
Why is my treadmill belt slipping?
A slipping belt usually stems from improper tension or a severe lack of lubrication. Over time, the constant impact from running causes the fabric of the walking belt to stretch. When the belt gets too loose, the front drive roller cannot grip the material properly. You can typically resolve these common treadmill problems by tightening the rear roller bolts and applying fresh 100% silicone lubricant to the deck.
Can I repair a treadmill motor at home?
We strongly advise against attempting a motor repair at home. Treadmill motors and their accompanying control boards handle high-voltage electricity that can cause severe shocks, even after you unplug the machine. Opening the motor housing also instantly voids most manufacturer warranties. If you suspect your motor is failing or burning out, always call an expert for a safe, professional treadmill repair.
How long do treadmills last?
A high-quality treadmill generally lasts between seven and twelve years. The exact lifespan depends heavily on your usage frequency and your commitment to preventative care. Consistent cleaning, proper deck lubrication, and prompt attention to minor mechanical noises will easily push your machine past the ten-year mark. Ignoring basic upkeep forces the motor to overwork, which drastically cuts the machine’s functional life in half.