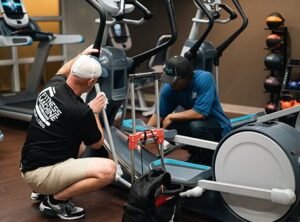
Picture this: peak hours hit the gym, or you finally carve out thirty minutes for a home workout, and the elliptical suddenly grinds to a halt. A harsh mechanical clank, a complete loss of resistance, or a completely dead display console instantly ruins your momentum. As a fitness equipment technician, I see this scenario play out every single day.
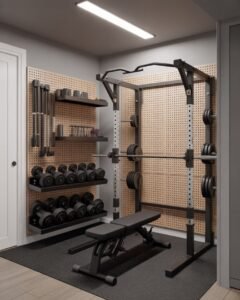
Dead fitness equipment causes major headaches for everyone involved. In a commercial gym setting, an “Out of Order” sign slapped across a popular machine leads to frustrated members, complaints, and disrupted facility operations. At home, a broken machine turns an expensive piece of fitness gear into a heavy, oversized coat rack, entirely derailing your personal health goals.
Understanding the mechanics of these machines is vital. Timely, professional elliptical repair serves as a critical maintenance need, not just an optional fix. Ignoring a minor squeak or a slightly jerky pedal stroke today almost always guarantees a costly motor or bearing replacement tomorrow. Routine care keeps these complex mechanisms moving safely and efficiently.
In this guide, I will walk you through the most frequent issues that plague these machines. You will learn exactly how to identify the root causes of performance drops, understand what goes wrong inside the housing, and discover practical repair solutions to get your equipment back in peak condition.
Why Elliptical Machines Break Down
When you step onto an elliptical, you expect a smooth, gliding motion. But as a fitness equipment technician, I rarely see machines in perfect condition. Breakdowns usually do not happen overnight. Instead, they result from a slow accumulation of wear, tear, and neglect. Understanding what causes these failures helps you stop them before they require an expensive service call.
Here are the primary reasons elliptical machines break down:
Lack of Lubrication
Ellipticals rely on dozens of moving parts working together in tight spaces. Pivot joints, rails, and ramps require a slick layer of grease or silicone to function properly. When this lubrication dries up, you get metal-on-metal friction. This friction creates a terrible squeaking noise, accelerates part wear, and forces the internal motor to work harder than it should.
Dust, Sweat, and Debris Buildup
Gyms and living rooms are full of dust, pet hair, and salt from human sweat. As you pedal, the machine’s cooling fans and internal belts pull these particles right into the housing. Sweat drops land on the frame and cause rust. Dust coats the flywheel and clogs the resistance magnets. Over time, this grime builds up thick enough to throw off the delicate sensors and jam the moving tracks.
Overuse in Commercial Gyms
Commercial elliptical machines are built tough, but they are not invincible. In a busy gym setting, a single machine might see ten to twelve hours of continuous daily use. This heavy rotation generates massive amounts of heat inside the drive system. If a facility ignores user weight limits or lets machines run non-stop without proper cool-down periods, the internal components simply wear out much faster than the manufacturer intended.
Worn-Out Bearings and Belts
Your elliptical uses a drive belt to connect the pedals to the flywheel. Just like the serpentine belt in your car engine, this rubber belt stretches, cracks, and eventually slips after miles of use. Similarly, the sealed bearings hidden inside the pivot arms take a massive amount of force with every step. When those bearings finally grind down and lose their internal grease, the entire pedal motion becomes jerky and unsafe.
Poor Maintenance Habits
The biggest enemy of fitness equipment is a “set it and forget it” mindset. Many gym owners and home users ignore the early warning signs of a breakdown. They turn up their headphones to block out a clicking sound or push through a slightly misaligned pedal stroke. Skipping routine inspections and ignoring basic maintenance schedules turns small, cheap fixes into massive structural failures.
Most Common Elliptical Machine Problems
As a fitness equipment technician, I spend my days diagnosing and fixing a wide variety of mechanical and electrical failures. While these machines look complex, the same handful of elliptical machine problems pop up time and time again. If you know what to look for, you can often identify the exact component causing the trouble. Here are the top five issues you will encounter and how we fix them.
1. No Resistance or Weak Resistance
Stepping onto an elliptical that spins freely with zero tension ruins your workout immediately. This is one of the most frequent calls I receive.
Causes:
The resistance system usually fails due to a bad resistance motor (also known as a servo motor) or a magnetic brake issue. Sometimes, the wiring harness that connects the lower control board to the upper display gets pinched, cutting off the signal to change tension. In older machines, the magnets themselves can get stuck in the “open” position due to rust or debris.
Repair Solutions:
First, I always check the wiring harness running up the main mast. If the cables look intact, I open the side shrouds to inspect the resistance motor. If the motor binds up or makes a grinding noise when you press the resistance button on the console, you need to replace it. If the motor works but the tension feels weak, I adjust the tension cable or realign the magnets closer to the flywheel.
2. Noisy or Squeaking Pedals
Nothing empties a gym floor faster than a loud, obnoxious squeak echoing with every pedal stroke.
Causes:
Noise almost always points to friction. Dry pivot joints, worn-out sealed bearings, and dirty ramp rails cause the bulk of these noises. If the squeak happens exactly at the same point in your stride, you likely have a dry bushing or a failing bearing in the crank arm.
Repair Solutions:
We start with a thorough cleaning. I wipe down the rails and wheels to remove built-up dust and sweat. Next, I apply a high-quality silicone-based or white lithium grease to the pivot joints and wheels. Never use WD-40, as it strips away necessary grease. If the noise persists after lubrication, I isolate the faulty bearing and press a new one into the joint.
3. Display Console Not Working
A dead screen turns your high-tech fitness machine into an oversized paperweight. You cannot track your metrics, and worse, you cannot control the resistance.
Causes:
Power supply issues are the most common culprit. This could mean dead batteries, a tripped surge protector, or a blown power adapter. If the power source works, the problem usually sits in the wiring harness. A pinched wire inside the upright mast will kill the power to the circuit board instantly.
Repair Solutions:
Check the outlet and swap the power adapter first to rule out basic electrical issues. Next, I unbolt the console and test the wiring harness connections with a multimeter. If the cables send the correct voltage but the screen remains dark, the circuit board has likely shorted out. At that point, replacing the entire display console is the only viable step.
4. Jerky or Uneven Motion
Your stride should feel smooth and continuous. If the pedals catch, stutter, or jerk forward abruptly, the machine is unsafe to use.
Causes:
Jerky motion usually stems from a failing drive belt or a dirty track system. If the grooved drive belt stretches out or loses its teeth, it will slip on the main pulley. Alternatively, thick grime on the ramp rails can cause the roller wheels to physically jump over the dirt, creating a harsh bump in your stride.
Repair Solutions:
I always check the tracks first. Cleaning the rails and inspecting the wheels for flat spots solves a surprising number of uneven motion complaints. If the tracks look good, I remove the side covers and inspect the drive belt. If the belt looks cracked, frayed, or loose, I install a replacement belt and calibrate the tension on the flywheel to restore a smooth glide.
5. Pedals Slipping or Loose Motion
If you feel a noticeable “clunk” or side-to-side wobble under your feet, the structural integrity of your machine needs immediate attention.
Causes:
Loose hardware is the primary cause of wobbly pedals. The sheer force of human body weight shifting back and forth slowly backs out the crank arm bolts. If left unchecked, this loose motion will strip the metal threads completely. A worn-out crank arm or damaged pedal arm bushing will also create a sloppy, slipping sensation.
Repair Solutions:
Tightening down the hardware often solves the problem if caught early. I use a torque wrench to secure the crank bolts to the manufacturer’s specifications, often adding a drop of threadlocker to keep them in place. If the metal threads look stripped or the mounting hole is stretched out, tightening will not work. In that case, I must replace the entire crank arm assembly to make the machine safe again.
Step-by-Step Elliptical Repair Guide
When an elliptical breaks down, guessing the problem wastes time and money. As a fitness equipment technician, I rely on a strict, systematic approach to get machines running smoothly again. Following a professional repair process ensures we fix the root cause, not just the symptom.
Here is the exact step-by-step method we use to bring dead fitness equipment back to life.
Inspection and Diagnosis
We start every repair with a full visual and auditory inspection. I turn on the machine, step onto the pedals, and listen closely to the drive system. We feel for any irregular vibrations or catches in the stride.
Next, we check the power cord, console connections, and exterior hardware for obvious damage. This initial sweep often reveals hidden issues, like a pinched wire or a loose crank bolt, before we even reach for our tools.
Identifying Faulty Components
Once we understand the symptoms, we remove the side shrouds to expose the internal mechanics. We look for black dust around the drive belt, which indicates severe rubber wear. We also inspect the flywheel bearings and the main pulley for signs of heavy friction.
If the problem seems electrical, we use a digital multimeter. We test the voltage running from the lower control board up to the console to ensure all electronic components receive proper power.
Testing the Resistance System
Resistance failures require careful, methodical testing. I manually adjust the tension from the display console while watching the resistance motor inside the housing. The motor should smoothly pull the tension cable or move the magnetic brake closer to the heavy flywheel.
If the motor clicks but fails to move, it requires replacement. If the magnets sit too far from the wheel but the motor works, we simply adjust the tension cable to restore the correct resistance levels.
Replacing Worn Parts
Swapping out damaged components takes precision and the right tools. Whether installing a new grooved drive belt or pressing in a fresh set of sealed bearings, we use specialized crank pullers and alignment tools.
I always clean the surrounding area thoroughly before installing a new part. Leaving old, dirty grease or dust inside the housing will quickly ruin the brand-new component we just installed.
Final Calibration
The repair does not end when we tighten the last bolt. We must calibrate the machine to ensure it operates safely and accurately. I run the elliptical through its built-in diagnostic mode, testing every single resistance level and incline setting.
We verify that the console tracks speed accurately and that the pedal stroke feels completely smooth. Finally, we wipe down the ramp rails and apply a fresh coat of silicone lubricant so the machine is ready for your next heavy workout.