
A slippery treadmill belt is usually caused by incorrect tension, belt misalignment, inadequate lubrication, or worn components. To fix it: unplug the treadmill, inspect the belt, check tracking and tension, verify lubrication, and run a low-speed test. If the belt still slips—or you notice motor noise, burning smells, or electrical issues—contact a certified treadmill repair technician.
A slipping treadmill belt is one of the most common complaints from both home gym owners and commercial fitness facilities. But “slipping” doesn’t always mean the same thing. A belt that slides backward under your weight is a different problem from a belt that drifts sideways off-center—and confusing the two leads to the wrong fix.
Getting the diagnosis wrong can make things worse. Tightening a belt that’s already overtightened, for example, places unnecessary stress on the motor and rollers. Lubricating a belt when the real issue is drive system failure won’t solve anything—and may mask a problem that worsens over time.
This guide walks through the most common causes of treadmill belt slipping, how to troubleshoot each one safely at home, and when it’s time to hand the job off to a qualified technician. Whether you own a treadmill at home, manage a gym in New Jersey, or oversee equipment across a multi-unit property, the information here will help you make a faster, smarter decision about your next step.
Why Is My Treadmill Belt Slipping?
Before adjusting anything, it helps to understand what’s actually causing the problem. During treadmill service calls, technicians commonly find five root causes behind a slipping or unstable walking belt.
Loose or Incorrect Belt Tension
The walking belt must maintain enough tension to grip the drive roller and support a user’s body weight without slipping. When the belt is too loose, it slides backward or stalls the moment someone steps on it—especially at lower speeds or when the user pushes off.
Tension that’s too tight is equally problematic. An over-tightened belt increases friction across the deck surface, forces the motor to work harder, and accelerates wear on the belt, deck, and drive roller bearings. Many people assume more tension automatically means less slipping. That assumption is often incorrect, and it’s one of the most common mistakes made during DIY adjustments.
Misaligned Walking Belt
A belt that drifts to one side—rubbing against the treadmill frame or appearing visually off-center—is experiencing a tracking problem, not a tension problem. These are two separate issues with different fixes. Misalignment typically happens when one rear roller adjustment bolt has been turned more than the other, when the treadmill sits on an uneven surface, or when the belt has stretched unevenly after heavy use.
Attempting to solve a tracking problem by tightening the belt will not correct the drift and may introduce additional tension imbalances.
Dry or Improperly Lubricated Deck
The walking deck and belt generate friction during every workout. Manufacturers design their decks with a specific lubrication requirement—typically a silicone-based lubricant applied to the underside of the belt and the top of the deck. When lubrication degrades or runs dry, friction increases dramatically.
The result: the belt feels sluggish, hesitates under load, or slips intermittently. Many users mistake this symptom for a tension issue and over-tighten the belt, compounding the problem. On the other hand, applying too much lubricant—or using the wrong type—can cause the belt to slip in a different way, essentially losing grip on the deck surface.
Worn Belt or Deck
Treadmill belts and decks have a finite service life. A belt that has worn thin loses the grip texture on its inner surface. A deck that has lost its factory wax coating or developed uneven wear patterns creates inconsistent friction across its surface. Either condition allows the belt to slip, especially under a user’s full body weight.
Worn belts often show visible signs: fraying edges, cracking on the surface, glazing on the underside, or a noticeably thinner profile at the center compared to the edges. Decks sometimes show visible grooves or a dull, dry appearance beneath the belt.
Drive System Problems
If belt tension, alignment, and lubrication all check out, the slipping may originate deeper in the drive system. The drive belt (the internal belt connecting the motor to the front roller) can stretch or wear over time, reducing the power transferred to the walking belt. Roller bearings that are worn or seized increase mechanical resistance, making the belt harder to turn. A failing motor or motor controller may not deliver consistent power, causing the belt to hesitate or slow under load.
These are not DIY repairs. Drive system diagnostics require disassembly, electrical testing, and component-level inspection by a trained technician.
How to Fix a Slippery Treadmill Belt (Step-by-Step)
Work through these steps in order. Do not skip the safety step—electrical and mechanical hazards are present even when the treadmill appears to be off.
Step 1: Turn Off and Unplug the Treadmill
Before touching any part of the treadmill belt or frame, press the stop button, remove the safety key, and unplug the power cord from the wall. This is non-negotiable. A treadmill belt can move unexpectedly when components are disturbed, and live electrical components pose a serious risk during inspection. Never place hands, clothing, or tools near the belt or rollers while the machine is connected to power.
Step 2: Inspect the Walking Belt
With the treadmill unplugged, lift the walking belt from the sides and visually inspect the full surface—both top and underside. Look for:
- Fraying or torn edges, particularly near the rear roller
- Surface cracking or glazing, which indicates age-related deterioration
- Uneven wear patterns, especially a thin or shiny center track where users typically walk
- Visible looseness, where the belt can be lifted significantly off the deck surface
If the belt shows moderate to severe wear, no amount of tensioning or lubrication will produce a lasting fix. Belt replacement is the appropriate next step.
Step 3: Check Belt Tracking and Alignment
Stand behind the treadmill and visually assess whether the belt is centered between the side rails. An equal gap on both sides indicates correct tracking. If the belt sits closer to one side, or has been rubbing against the frame (look for scuff marks on the belt edges or the frame interior), the rear roller needs to be adjusted.
To re-center the belt, locate the rear roller adjustment bolts—typically a hex bolt on each side at the back of the treadmill frame. To move the belt left, turn the left bolt clockwise a quarter turn. To move it right, turn the right bolt clockwise a quarter turn. Make small, equal adjustments and check alignment frequently. Do not make large adjustments or turn bolts on one side only.
Always consult your owner’s manual for model-specific alignment instructions before making any adjustments.
Step 4: Check and Adjust Belt Tension
With the belt centered, assess its tension by lifting it at the midpoint along one side. A properly tensioned belt typically lifts 2–3 inches. Consult your owner’s manual for the manufacturer-specified lift distance, as this varies by model.
To increase tension, turn both rear roller adjustment bolts clockwise by the same amount—typically a quarter turn at a time. To decrease tension, turn both bolts counterclockwise equally. Always adjust both sides evenly to avoid inadvertently creating a tracking problem while fixing a tension problem.
After each adjustment, re-check the belt lift and the visual alignment before proceeding.
Step 5: Check Lubrication
Consult your treadmill’s owner’s manual to confirm whether your model requires lubrication and what type. Most modern treadmills specify 100% silicone lubricant applied to the top of the deck, under the walking belt. Some models come pre-lubricated and are not designed to be re-lubricated by the user.
Never use WD-40, petroleum-based lubricants, or general-purpose spray lubricants on a treadmill deck. These products degrade belt materials and can damage the deck surface.
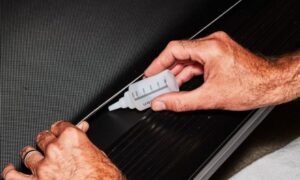
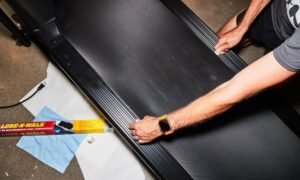
To apply lubricant: with the treadmill unplugged, fold back the walking belt from one side and apply the lubricant along the center of the deck surface in a thin, even line. Avoid over-application—excess lubricant is as problematic as too little.
Step 6: Conduct a Low-Speed Test
Once adjustments are complete, plug the treadmill back in, stand to the side of the belt (not on it), and start the machine at its lowest speed—typically 0.5 to 1 mph. Observe the belt for smooth, centered movement. Then step on slowly and walk at a low speed, watching for any slipping, hesitation, or sideways drift.
Do not test at high speed immediately after making adjustments. Gradual testing allows you to catch any remaining issues before they become hazardous.
Common Mistakes to Avoid
Even with the right intentions, DIY treadmill belt adjustments often go wrong. Here are the most frequent mistakes technicians see during service visits—and why they matter.
- Over-tightening the belt. Excess tension stresses the motor, bearings, and rollers. A belt that is too tight will cause the motor to run hot and can significantly shorten the lifespan of multiple components.
- Adjusting only one rear roller bolt. Turning a single bolt throws off the belt’s lateral alignment, converting a tension problem into a tracking problem.
- Applying lubricant without checking the manual. Not all treadmills require user-applied lubrication. Using lubricant on a self-lubricating deck, or applying the wrong product, can damage both the belt and the deck surface.
- Continuing to use a visibly damaged belt. A frayed, cracked, or glazed belt cannot be fixed through tension or lubrication. Operating a damaged belt risks further mechanical damage and poses a safety hazard to the user.
- Ignoring unusual motor sounds. A humming, grinding, or burning smell from the motor area is a warning sign that should not be dismissed. These symptoms indicate drive system issues that require professional diagnosis.
- Testing at high speed immediately after adjustment. Small errors in adjustment become magnified at higher speeds. Always conduct an initial low-speed test and observe the belt behavior before increasing the pace.
- Assuming tension is always the cause of slipping. This is perhaps the most costly mistake. Slipping can originate from lubrication, wear, alignment, or drive system failure. Defaulting to tension adjustments without diagnosing the actual cause delays the right fix and may cause additional damage.
When Should You Call a Treadmill Repair Technician?
Some treadmill belt issues can be resolved safely at home. Others require professional tools, replacement parts, and technical knowledge that goes well beyond a belt adjustment.
Contact a qualified treadmill repair technician if you notice any of the following:
- The belt continues to slip after tension and lubrication have been correctly addressed
- You hear grinding, squealing, or humming sounds from the motor or roller areas
- You notice a burning smell during or after operation
- The belt stops completely under the user’s weight, rather than slipping gradually
- The motor runs but the belt does not move
- The console displays error codes related to the motor or speed sensor
- The drive belt (internal) appears stretched, cracked, or broken
- Rollers feel rough or seized when turned by hand with the machine unplugged
- The belt is visibly worn, frayed, or damaged and requires replacement
For treadmill owners in New Jersey and the surrounding region, NJ Fitness Equipment Repair provides on-site diagnosis and repair for all of these issues. The team services home treadmills and commercial gym equipment across New Jersey and New York, including Westchester County, Rockland County, and the Bronx.
Call (201)-306-1898 or request a service visit online to schedule a same-day appointment.
DIY vs. Professional Treadmill Belt Repair
| Issue | DIY Appropriate? | Notes |
| Belt feels slightly loose | Yes | Adjust rear roller bolts evenly; follow manufacturer specs |
| Belt drifting to one side | Yes (with caution) | Small, equal bolt adjustments; check alignment frequently |
| Dry or under-lubricated deck | Yes | Use only manufacturer-recommended silicone lubricant |
| Belt visibly worn or frayed | No | Requires belt replacement; professional recommended |
| Belt slips after correct adjustment | No | Indicates deeper drive system issue |
| Grinding or squealing noises | No | Potential roller bearing or motor failure |
| Burning smell from motor area | No | Electrical or motor issue; unplug immediately |
| Drive belt worn or broken | No | Internal component; requires disassembly |
| Motor or motor controller failure | No | Electrical diagnosis required; do not attempt DIY |
| Error codes on console | No | Requires diagnostic tools and technical knowledge |
Frequently Asked Questions
Why does my treadmill belt slip when I step on it?
A treadmill belt that slips under the user’s body weight is most commonly caused by insufficient belt tension, a dry or under-lubricated deck, or a worn belt that has lost grip on the deck surface. In some cases, a failing drive belt or motor controller may also cause this symptom. Start by checking lubrication and belt tension per your owner’s manual before assuming the cause.
How do I know if my treadmill belt is too loose?
With the treadmill unplugged, lift the belt at the midpoint along one side. Most manufacturers specify a lift of approximately 2–3 inches for correct tension. If the belt lifts significantly higher than this, or you can see daylight beneath it when standing on the deck, the belt is likely too loose. Always verify the exact specification in your owner’s manual.
Can lubrication fix a slipping treadmill belt?
Lubrication can resolve slipping caused by excessive friction between a dry belt and deck. However, it will not fix slipping caused by incorrect tension, belt misalignment, or a worn belt that has lost its grip surface. Applying lubricant to a belt that slips for another reason does not address the root cause and may obscure the actual problem.
Why does my treadmill belt move to one side?
A belt that drifts sideways is experiencing a tracking (alignment) issue—not a tension issue. This is typically caused by uneven adjustment of the rear roller bolts, an uneven floor surface, or asymmetrical belt wear. Correct it by making small, equal adjustments to the rear roller bolts and checking alignment frequently. Do not attempt to correct tracking by tightening the belt unevenly.
Should I tighten my treadmill belt if it keeps slipping?
Not necessarily. Tightening is appropriate only when the belt is confirmed to be below the manufacturer’s recommended tension. Over-tightening is a leading cause of motor strain, bearing wear, and premature component failure. Always diagnose the cause of slipping before making tension adjustments.
Can a worn treadmill belt cause slipping?
Yes. A belt that has worn through its grip surface—particularly on the inner (deck-facing) side—loses its ability to maintain traction, regardless of how correctly it is tensioned or lubricated. Glazing, thinning, or surface cracking are signs that the belt has reached the end of its service life and requires replacement.
How do I know when my treadmill belt needs to be replaced?
A treadmill belt should be replaced when it shows visible fraying, cracking, surface glazing, or uneven thinning. Other signs include persistent slipping after correct tension and lubrication adjustments, a rough or jerky feel during use, and visible discoloration or wear patterns on the inner surface. A professional technician can confirm whether belt replacement or deck resurfacing is also needed.
When should I call a professional instead of fixing the belt myself?
Call a professional when: the belt continues to slip after correctly addressing tension and lubrication; you hear unusual motor or roller noises; you detect a burning smell; the belt stops completely under load; or the console displays motor-related error codes. These symptoms indicate drive system issues that require professional diagnosis and repair. For residents and facility managers in New Jersey, NJ Fitness Equipment Repair offers on-site service with same-day availability.
Don’t Let a Slipping Belt Sideline Your Workout
A slippery treadmill belt is rarely a reason to retire a machine—but it does require a methodical approach. Correctly identifying the cause before reaching for a hex key or a lubricant bottle saves time, prevents additional damage, and keeps the repair within a manageable scope.
For straightforward cases—a slightly loose belt, a dry deck, or minor tracking drift—the steps outlined in this guide should get your machine back to safe, reliable operation. For everything beyond that, the smarter move is to let a trained technician handle the diagnosis.
NJ Fitness Equipment Repair serves home treadmill owners, commercial gym operators, and fitness facility managers across New Jersey, New York, Westchester, Rockland, and beyond. The team carries 15+ years of hands-on experience with all major treadmill brands and can diagnose a slipping belt issue during a single on-site visit.
? Call (201)-306-1898 or request a service visit online. Same-day appointments available.
Explore related resources from NJ Fitness Equipment Repair:
- Treadmill Repair Services — Full-service diagnosis and repair for all treadmill brands and models
- Common Treadmill Problems — A guide to the most frequently seen treadmill faults and what causes them
- Treadmill Belt Repair and Replacement — What to expect when your belt needs professional attention
- NordicTrack Treadmill Repair — Specialized repair support for NordicTrack treadmill owners
- Preventive Maintenance Services — Routine inspections to prevent belt slipping and other issues before they start